Volume I: Guide to EPICURE for Beamline Users
Research Division Controls Software Release Note 34.1
William S. Higgins, S. Baginski, E. Dambik, B. Kramper, T. Vraniak, and R. West
EPICURE
is the control system which runs beam transport systems and
instrumentation in the Experimental Areas at Fermilab. This region
includes all
extracted beams for fixed-target physics. In EPICURE, tasks such as data
acquisition, database lookups, and computation are distributed among many
minicomputers, workstations, and intelligent modules. For a general
description, see EPICURE Design Note 14, ``An Overview of EPICURE
Architecture.''
This manual (Volume I) should provide the information a user needs to get
started on EPICURE and perform most routine beam-tuning operations. Volume II,
Guide to EPICURE Operations, is intended for technicians and deals with
specialized software of little interest to experimenters or other beam tuners.
Volume III, Application Programmer's Guide, explains how to write software
that makes use of the EPICURE services library. All three volumes are expected
to change in the near future as EPICURE evolves.
This book will assume that the reader is familiar with the VAX and its VMS operating system.
To obtain an account on the EPICURE machines, you need to submit a request
to the System Manager. A request forms is attached to this document as
Appendix
; other copies are available on the 12th floor of
Wilson Hall. Fill out these forms with your name, the password you desire,
and your purpose for
using EPICURE. (Note that the password must be at least eight characters
long.)
Your account will enable you to log into any node on the ``DISNEY cluster.'' A VAX cluster is a grouping of several individual machines which share disk space and which appear to their users, in many ways, to function as a single machine. Each individual machine is a node on the DECnet network, but the cluster also behaves as a node. The DISNEY cluster is the group of operational EPICURE nodes, used mostly for beam tuning and managing beamline devices in the experimental areas.
Most EPICURE programs can be run either from DISNEY or from other machines or clusters (such as nodes associated with experiments) which have compatible software installed.
If you wish to interact with beamline devices, apply for a DISNEY account. Here are few pointers for new users of DISNEY:
Tools for software development and documentation, such as compilers, debuggers, and text processors, are not available on DISNEY. Programmers should develop EPICURE applications software on other nodes or clusters. If you are interested in writing programs to interact with EPICURE, consult with the System Manager and pick up a copy of Software Release Note 37, EPICURE User's Guide Volume III: Application Programmer's Guide.
(This introductory message may be somewhat different on different terminal servers.) At this point you may typeDECserver 200 Terminal Server V1.0 (BL20) - LAT V5.1Please type HELP if you need assistance Local>
if you want to log into the DISNEY cluster, for example. You will then be prompted for username and password in the usual manner of VAX/VMS systems.CONNECT DISNEY
Typing
at the terminal server prompt will yield a list of the computer services available from this terminal server. Typing HELP will obtain more explanation of the terminal server's commands.SHOW SERVICES
After you log out of your VAX, you will return to the terminal server. You may use the CONNECT command to log into another computer, or you may say goodbye to the terminal server by typing
which will end your session.LOGOUT
When you hit RETURN a time or two, the port selector prompts you with a message like:
type the letters RDCS and you'll be connected to the terminal server, which can reach any of the Research Division Controls nodes.FERMILAB [A] =
When you log out of the terminal server, you should be returned to the port selector. You can start another session, or you can ignore it and walk away. After a few seconds with no response, the port selector will say DISCONNECTED. (In this case, if you want to do more, you'll have to hit RETURN a time or two to regain its attention.)
and you will be prompted for your account name and password. When you log out of the DISNEY Cluster machine, you will be back to your original session executing on the local network node.SET HOST DISNEY
Group accounts will be set up to go straight to the EPICURE
menu (described in chapter
),
where EPICURE applications may be accessed. These include PAGE,
PLOT, RONALD and others.
A facility will be available to the group account's manager
by which local programs may be added to the menu. These programs
will appear only on the menu for this particular group account, and
will probably consist of programs relating to the experiment's beamline tune
and the like.
Group accounts will have the ability to access MAIL as one of the menu choices, but they will not be able to exit the menu to reach a DCL prompt.
Individual accounts have a symbol MENU defined (in the system login file)
which will run the EPICURE menu shell program. To run the menu,
type MENU. This will invoke the MENU program and
provide you with an easy way to run other EPICURE applications.
See chapter
for instructions on using the menu program.
The VMS operating system makes it easy to ask for help on its commands. Type HELP to see a list of topics for which help is available. When the list is displayed, you may type one of the keywords in the list to find out more about it.
We expect that readers of this manual have already familiarized themselves with the VMS HELP facility.
There is a library of HELP information specific to Fermilab's machines and the EPICURE system. Its operation is identical to the VMS HELP facility.
It can be queried on any WARNER or DISNEY node by typing
orHELP @USERGUIDE
HELP @USERGUIDE topicname
The FERMIHELP library describes non-DEC products installed on the EPICURE machines. These topics should be browsed for information on some very widely used utility programs and procedures installed there.
To query FERMIHELP, type
orHELP @FERMIHELP
HELP @FERMIHELP topicname
Timely news about new system software or hardware is posted by the system managers, and you can read it by typing
or the commandHELP @NEWSLIB
NEWS
Software Release Note 1 is an index to all other SRN's, and the Controls Group strives to keep it up to date.
EPICURE includes a device-protection scheme so that devices can only be manipulated by authorized users. Each user is granted a set of privileges to change settings or status on a set of devices designated by ``class'' and ``domain'' values. ``Class'' corresponds roughly to device function, such as Primary Power Supply (PRMPS), Cryogenic Devices (CRYO), Interlocks (INTLK), and so forth. ``Domain'' corresponds to a ``geographical'' or beamline-oriented category, such as Meson East (ME) or Proton Center (PC) beams. These privileges are granted solely by the Site Operations Group according to safety policies and the needs of each user. For example, an experimenter may be allowed to set secondary-beam magnets, and devices in the experimental hall, in a single beamline. An operator, on the other hand, needs to tune beam to every experiment, so he would be allowed to control devices in all beamlines.
Attempts to modify a device for which you don't have the proper privilege will result in this message:
Some applications programs, which truncate messages to save room, may display this as %NOPRIV.%PIG-E-NOPRIVILEGE, No privileges granted to access this device and property.
A wide range of EPICURE software has been written which may be useful in beam tuning. Some of these application programs are discussed here. Since new software is being written, and old software revised, constantly, you should not consider this document the final word on available programs. Consult the Research Division Controls Group and the Site Operations Department for information on recent application development.
The MENU program allows users easily to pick the application they want to run. It does not require extensive knowledge of VMS or DCL commands, so it is the simplest way for a beamline user to interact with the EPICURE system. You can use the arrow keys and the PREV SCREEN and NEXT SCREEN keys to move around within the menu, and press RETURN or ENTER to choose the highlighted application.
The MENU program is documented in chapter
and in Software
Release Note 39, ``The EPICURE Menu Shell Process,'' by R. West.
PAGE is the most important program to learn if you are a new EPICURE user. It is the most generally useful program for reading and controlling beamline devices. Each of the 22 lines it displays can hold one device's name, with the reading, setting, status, and other information about the device. The user can type in the setting column or the status column to change the device's state.
The operation of PAGE is described in chapter
and in
Software Release Note 22, ``Parameter
PAGE User's Guide,'' by E. Dambik
CRYOPLOT is an application which allows a user to plot up to four device readings against time. Since it uses the GKS graphics package, it works somewhat differently than other applications. Most notably, its user employs a mouse to move around CRYOPLOT's windows.
For more about CRYOPLOT, see chapter
or Software Release Note
58, ``User Interface to the CRYOPLOT Program,'' by B. Kramper.
It is often necessary to ``remember'' the setting values a group of devices, such as a set of power supplies in a beamline or a set of timing module channels. For instance, once a beamline is tuned for efficient transmission at a particular energy, magnet currents should be ``memorized;'' this also implies that the ``memorized'' settings can be restored to the devices at some later time. This is the function of the PRESERVE application.
PRESERVE can also switch on a set of power supplies with its STARTUP function; switch them off with SHUTDOWN; and switch them into DC levels (zero current) to save power with STANDBY. Its COMPARE feature allows the user to compare saved values with the present settings before commanding a RESTORE operation.
PRESERVE is documented in section
.
The Segmented Wire Ionization Chamber (SWIC) is a fundamental tool for measuring beam position and profile. The SWIC is read out by a microprocessor-based scanner described in Experimental Areas Guide to CAMAC and Beamline Transport Devices, page 93. To control this scanner, the SWIC REBOOT program has been written. This program can set individual parameters of the scanner, such as gain, charge time, and number of scans; it can also set up the scanner with a complete set of stored values in a single action.
SWIC REBOOT is documented in section
.
RONALD reads a series of commands out of a ``script'' file and executes them to change the setting or status of devices. It also allows the user to create script files, modify them, preview them, and inventory existing script files.
RONALD is documented in section
and in Software Release Note 43,
``RONALD: A Script Reader,'' by W. S. Higgins.
TIME READ is a program which samples a numerical reading at a desired frequency for one machine cycle, and prints out a table of the results.
SCAN is an application which varies the setting of a magnet or collimator and measures its effect on intensity monitors. This automates a scan to optimize beam transmission. It is documented in Software Release Note 55, ``SCAN: A Beam Tuning Application,'' by Bruce Baller.
Some significant applications for the EPICURE system are still under development, but are expected to be operational soon.
A Device Database editor (DBEdit) will enable users to query the database about devices and their properties and attributes. It will also allow privileged users a convenient way to modify the Device Database by adding, deleting, or changing device entries.
An Alarms Subsystem will be implemented to perform monitoring of device values and to notify users when a device goes out of a specified range of values.
A SWIC Readout program will bring the ability to read SWIC profiles through EPICURE as well as through the current cable TV system.
This chapter has also been published as Software Release Note 39, ``The EPICURE Menu Shell Process,'' by R. West.
The MENU process provides a menu interface for the selection and execution of application programs. This process interacts with several different hardware terminals: (1) a text-only terminal such as a VT220, (2) a graphics terminal such as a VT240/330/340, or (3) a workstation such as a VAXstation.
Figure
is a sample screen from the MENU shell program.

The display for a menu consists of three sections: title line, item list, and message response. A menu list may contain a maximum of 999 entries. However, a display screen can only contain a maximum of sixty entries arranged in 3 columns of 20 lines each. The keys NEXT SCREEN and PREV SCREEN scroll the display forward and backward, respectively, through the menu list. A single menu usually consists of four or fewer display screens.
An individual at a terminal uses the arrow keys to move the cursor to the desired menu entry and then types the RETURN or ENTER key to select that entry. The menu item identified by the cursor is always displayed in reverse video. If the selected menu entry contains the name of an application program, execution of that program is initiated. Selection of an entry which is blank or is a comment results in no action.
There is potentially an unlimited number of menus. However, the number of menus actually implemented will probably be fewer than 10. To get to a different menu, the user types the name of the menu, followed by RETURN or ENTER. The first screen of the named menu is then displayed. To immediately select an entry on a menu which is not currently displayed, the user types the name of the menu and the number of the desired entry. It is also possible to select an entry from the current menu by typing its number instead of making the selection by moving the cursor. If the currently displayed menu screen does not contain the selected menu entry, the corresponding menu screen is accessed and displayed.
On a workstation, several applications may simultaneously be executed. Depending upon their physical memory requirements, the maximum number of simultaneous applications is usually about six. To free some space on the screen of the workstation, the MENU display window may be shrunk to an icon after starting the desired application program(s).
A menu list entry contains several fields of information. Only one, the title of the application program, is displayed by the menu process. The menu entry also contains the full name of the executable image, various status flags, and a set of parameters. The set of parameters in a menu entry includes DCL commands for establishing the VMS environment prior to initiating execution of the application program. The contents of any entry or field of a menu may be modified by using any text editor to change the corresponding disk file.
At the highest level, the selection and execution of application programs is controlled by a loop in a DCL command procedure. The DCL procedure initiates the MENU process via a RUN command. By interacting with the MENU process, the user selects an application program. Based upon the user's selection, the MENU process defines various logical names and then passes control to a spawned DCL procedure which uses the defined logical names to execute the selected application program. When the application exits, the subprocess returns control to the MENU process to enable the user to make another selection. On a workstation, the MENU process continues to execute in parallel with the subprocess, enabling the user have multiple selections simultaneously executing.
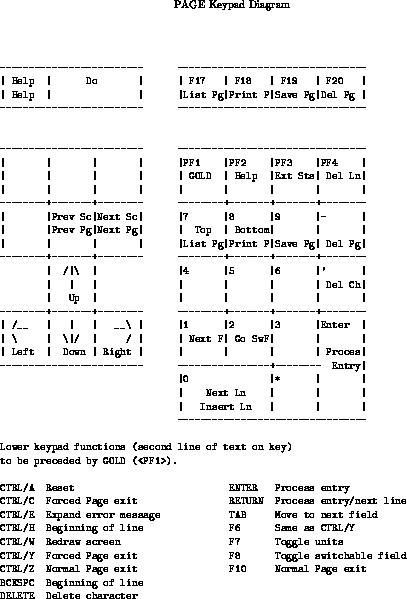
The keyboard on a VT220-type terminal consists of several parts: main keypad, editing keypad, auxiliary keypad, and top-row function keys. All keys with the exception of F7 through F9 and F16 (DO) of the top-row function keys are reserved for use by the control system. User programs may assign application-specific meanings to the striking of those top-row function keys not allocated for system use. Striking the RETURN key on the main key pad or the ENTER key on the auxiliary keypad produces the same result. Either one terminates the entry of a sequence of keys from the terminal. One of several standard keys may be used to terminate an operation within an application program:
The HELP key on the editing keypad is used to display a window of help information. Keys PF1 through PF4 on the auxiliary keypad and F17 through F20 of the top-row function keys are used to initiate or ``introduce'' a request for a system service. The request must be terminated either by ENTER or RETURN.
[PF1] menu-name entry-number ENTERintroduces a system request to process a menu selection. Entering only the menu-name is a request to display that menu. Entering only the entry-number is a request to initiate execution of the corresponding application in the currently displayed menu. Either the main keypad or the auxiliary keypad may be used to enter numeric input. Entering both the menu-name and the entry-number is a request to execute the application program at the specified entry in the specified menu. Specifying a menu entry which does not reference an application program results in displaying the associated menu screen. Typing the key PF1 is optional.
When a menu is displayed on the screen, the arrow keys on the editing keypad may be used to move the screen cursor to the desired menu entry. Selection of the item at the cursor is then indicated by typing the RETURN or ENTER key. The keys PREV SCREEN and NEXT SCREEN on the editing keypad scroll the menu display to the previous screen or to the next screen of the menu, respectively.
[PF2] entry-number ENTERintroduces a system request to select the designated entry from the currently displayed menu. Typing the key PF2 is optional
The disk files which contain the menu information are simply ASCII text files which may be modified by any text editor. A MENU file may contain from 1 to 999 menu entries, with each entry having the following format:
#number``title''[command]
[prefix]
The MENU process is accessible via the VAX account EPICURE_DEMO with the MENU files and all the application programs residing in the area associated with the managing account EPDEMOMGR. The default file used by the MENU process is defined by the logical DEFAULT_FILE, which initially is set to DEFAULT.MNU. The default extension for a MENU file is MNU.
This chapter has also been published as RD Controls Software Release 22, ``Parameter PAGE User's Guide,'' by E. Dambik.
Due to the use of modern terminals and DEC's screen management package (SMG), the new experimental areas PAGE more resembles that of ACNET than its EPICS predecessor. This difference is most notable in the respect that, since the EPICURE control system is not intended to use a command language such as CBASIC, all common ``commands'' must be built into PAGE itself, using menus and/or key definitions. The current initial release of PAGE relies on EDT-like key definitions; however, this is seen as evolving into a menu-driven system in the near future.
To run the parameter PAGE, choose it from the MENU shell.
PAGE contains a subset of key commands intended to monitor and control beamline devices. A page is currently limited to an 80-column by 24-row screen size. The keys are based on the EDT keypad layout to help avoid relearning a new keypad. PAGE can create, edit, and delete parameter pages, read devices at user-selectable intervals, and display the device data in one of three forms (raw data, intermediate or engineering units). A reminder of the keypad functions can be obtained by pressing the <HELP> or <PF2> keys.
The page
itself is divided into fields (see figure
). The first
row of a page
contains the page name, title, and default file specification fields. A page
is uniquely identified by the name entered into the name field. A title may
be optionally added to supply additional information about a specific page.
The default file field is used to read pages from other user accounts. The
main body of a page deals with devices and contains the following fields in
order (note that some fields are read-only and cannot be typed in):
- one-character flag (read-only)
- device name
- setting value readback and entry
- readback value (read-only)
- units text string
- generic status and control bits
- switchable field with text, rate, or knob scale
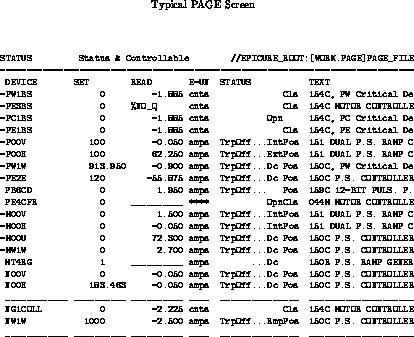
Data acquisition and setting by PAGE is screen-oriented. Device readbacks, readings of setting values, and status readbacks are scaled and placed in the appropriate fields on Page. If a device doesn't have the attribute defined for a particular type of data acquisition or setting, either the field will remain blank or a %DB-W-NOATTR error (truncated as %NOATTR in some fields) will be displayed. Any errors encountered in reading or setting a device will be displayed in the appropriate field for the affected device(s). The fields involved in data acquisition and setting are:
``<'' (points left) User cannot change the SET value.
``>'' (points right) User cannot set CONTROL bits.
``-'' (no point) User cannot change SET or CONTROL.
See figure
for a summary of the keypad layout and other
commands. Use of PAGE can be broken up into four categories - page editing,
file operations, device parameter selection and extended status mode.
Throughout this document, actual key names will be enclosed in angle braces
such as <PF1>. In addition, keypad keys will be preceded by ``KP'' to
distinguish them from the main keyboard variety, e.g., <KP0> represents
the zero (0) key on the keypad. The key <PF1> is named the GOLD key
and is used to access alternate definitions of keys by pressing the
sequence GOLD <key> (the lower line of text on the labels of some keys in
figure
). Most keys will repeat if held down.
WARNING! Please be aware that your terminal must have its tabs set and
saved to every 8 columns for SMG (and hence PAGE) to work correctly.
To edit a page, the cursor may be moved to any screen position via the arrow keys. Information is typed into a field and acted upon only when the RETURN key is pressed. The entry is accepted from the beginning of a field to the position of the cursor in the field. The <HELP> key or <PF2> key will display a keypad diagram when pressed.
File operations in PAGE include listing a directory of pages, displaying, saving, and deleting pages, and changing the default page file specification in which the pages are stored. Pages can not be saved to or deleted from files that are opened for read-only access. A Page file search directory can be specified by defining the logical name PAGE_AREA. This directory will be searched first for existing page files when a new page file name is entered. The file specification of the last opened page file and certain other parameters are stored in the file PG_AUXFIL.DAT located in the user's login area. Page will create PG_AUXFIL if not found.
Device parameters in PAGE deal with data acquisition and data setting services. These parameters include the actual setting data and control bit operation, how the reading and setting data are to be interpreted, and at what rate the reading data will be read.
Certain fields can display more than one type of information. The switchable (TEXT/RATE/KNOB) field can be made to display either database text, reading rate, or knob scale factor by pressing the <F8> key until the desired field is displayed. The knob scale factor is stored with the page but has no use on this release.
 A frequency, where
is the integer period in
milliseconds. E.g., F1000. Setting this period under
some minimum time (currently 1000 milliseconds) may result in DAR
returning an ``invalid FTD'' (Frequency-Time Descriptor) error.
A frequency, where
is the integer period in
milliseconds. E.g., F1000. Setting this period under
some minimum time (currently 1000 milliseconds) may result in DAR
returning an ``invalid FTD'' (Frequency-Time Descriptor) error.
 offset A phase reversal,
where
offset A phase reversal,
where  is the phase
reversal number and offset is in milliseconds. E.g., T5+1000.
is the phase
reversal number and offset is in milliseconds. E.g., T5+1000.
 offset - A Tevatron
clock event, where
offset - A Tevatron
clock event, where
 is the Tevatron
event in hexadecimal and offset is in
milliseconds. E.g.,
X2F+10.
is the Tevatron
event in hexadecimal and offset is in
milliseconds. E.g.,
X2F+10.
The rate may be defaulted to the database at any time by hitting a <RETURN> or <ENTER> in this field after specifying a blank or an invalid FTD. Please note that a rate may be entered into this field before a device name is entered on the line. Any and all subsequent devices entered on this line will be read at the specified rate until either the rate is defaulted to the database or a new page is called up.
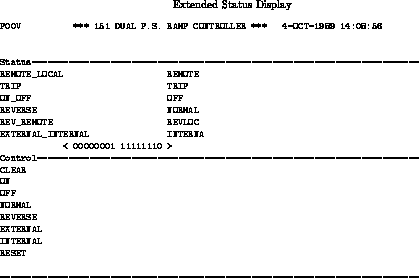
In addition to the generic status and control bits on PAGE, an extended
status and control mode is available. To select a device, place the cursor
on the PAGE line containing the desired device and press <PF3>. PAGE will
then display a screen with all status bitnames, their current states, and
the control operations defined for the selected device. The first line of
the screen will display the device name, its database text, the current
date and the time from the last status update or control operation
completion. System errors are displayed on the second line. The remaining
screen is split between status and control. See figure
for an example of this display.
This chapter is an introduction to the use of the CRYOPLOT program on the EPICURE Control System. (It has also been published as Software Release Note 58, ``User Interface to the CRYOPLOT Program,'' by Brian J. Kramper.) CRYOPLOT plots a graph of a device reading against time for a number of devices.
The program is divided into three major areas, each of which has a workstation
window associated with it: GRAPHICS, PARAMETERS and HELP. These windows are
pictured in Figure
.
When the program is selected from the menu, only the GRAPHICS and PARAMETERS
windows appear on the workstation display;
the HELP window must be requested with the mouse.
Input to the program is made with either the mouse alone, or with the mouse
in conjunction with the keyboard.
The mouse position indicator on a workstation is normally the pointer; for
the CRYOPLOT program, this pointer is replaced by a cross-hair within a square.
For purposes of this document the ``cross-hair within a square" will be known
as the ``pick."
Mouse input is called picking and is accomplished by moving the pick to
a ``detectable segment'' on the display and depressing the leftmost button
on the mouse.
Segments are known to be ``detectable'' if, when moving the pick through a
segment, the extent rectangle of that segment is marked by a broken line.
Picking a detectable segment will result in either an immediate action or
the appearance of a dialog box for keyboard input,
depending on the segment picked.
All keyboard input is terminated by depressing the RETURN key.

Any problems or bugs should be reported to Brian Kramper together with as much information as possible about what was being done with the plot. This would include the device names and their limits, the interval, and any informational messages displayed on the screen. The best method is to use the MAIL facility and send the information to WARNER::KRAMPER.
Below are listed the brief messages which appear when topics are selected.
Many applications developed for EPICURE employ a standard user interface, calling the EPICURE Screen Management (ESM) routines. MENU, PAGE, and CRYOPLOT do not use the ESM interface. Most other useful applications do employ it, though. You should become familiar with this interface; once you've mastered its features you will easily learn to use new programs. It provides a standard style and set of keys for manipulating menus and other input and output.
This chapter will discuss application programs which all make use of the ESM
interface. A tutorial in using this interface appears in Appendix
; if you are unfamiliar with ESM, you should try working with the
simple example program described there.
An essential requirement of the beamline control system is the ability to save the current settings of beamline devices. An individual beamline contains anywhere from a dozen to several dozen independent power supplies, each of which has a unique setting to yield the proper beamline tune. Note that many beamlines have several tunes, depending on the desired energy or running mode. In addition to the ``flattop'' setting of a power supply-which is what the user is typically concerned with-all power supplies which operate in a ramped mode have settings (called ``levels'' and ``slopes'') which control the rate at which the power supply is taken up to flattop.
All of these settings can be input to the power supply module using the PAGE application. However, when changing the running mode of a beamline it is not desirable to input the magnet settings via PAGE, but rather to RESTORE the settings for a particular beam tune from a list of saved devices and settings. Likewise, the ability to restore levels and slopes from a saved file is essential when recovering from a power outage or module change, where the power supply module has ``forgotten'' the information. It would also be desirable to be able to turn the power supply ON, OFF, or to DC through the same application while it is saving or restoring values.
This note describes an application to provide the EPICURE user with STARTUP, SHUTDOWN, STANDBY,SAVE, RESTORE and COMPARE functions. The application uses the EPICURE Screen Management Environment and is menu-driven. Saved values are stored in files with the extension .SAR (for ``save and restore'').
In addition to Print and Exit the main menu bar provides the three options: CHANGE MODE, RUN BY, and DIRECTORY.
The Change Mode option allows the user to select among six options described below. When an option is selected it will set flags as to what was selected. Then that function will be performed, using a specified page file.
The STARTUP option will turn ON the selected set of devices. It will set up the devices for transporting beam. It performs a RESET, then ON, then RAMP, in sequence. For a power supply, it does not affect the device's analog setting value. For 091 timing modules, it restores the phase-reversal clock reference time, but not the delay offsets. When STARTUP is selected, the user has the option of restoring values at the same time.
The SHUTDOWN option will power supplies OFF to prepare the beamline to shut down. When this option is selected, the user may additionally choose to save the setting values at the same time. If he chooses to save settings, the program allows the option of saving the readback values as well.
The STANDBY option is similar to the Shutdown option above. It differs only in that the devices are set to DC. This will be used primarily to save on power consumption when no beam is expected. (It is customary to specify that the DC level on normally-ramped power supplies be zero amperes. Thus setting a supply to DC effectively sets it to zero current, but leaves the supply in the ON state.)
The SAVE option gives the user the choice of saving devices with or without readback. This option is given since a SAVE with readback could take up to a minute to process. If a SAVE with readback is chosen, a timed read is used to get the values-which include setting, status, and readback-at flattop. Otherwise the status and setting are read and saved immediately.
The RESTORE Option will restore setting values for a list of devices. This list of devices will be input later through a *.SAR file. Only settings, not status values, are changed. (In a later version of the program the user will be given the option to restore polarity and RAMP/DC status. )
The COMPARE option retrieves a device list from a user-selected *.SAR file. The application will then determine the current SETTING for each device and compare it to the saved SETTING. The current SETTING, the saved SETTING and the difference will be displayed on the screen. It will also compare the RAMP/DC and polarity of the actual and saved status. It will then display an indication that there is a difference between the two statuses.
The RUN BY option is where the actual running of the program occurs. There are two options to choose from: DEVICE LIST and PAGE FILE.
The DEVICE LIST option will get its list of devices from a file created by EDT. This will be implemented in a later version of the program.
When the user selects the ``PAGE FILE'' option, a list of PAGE files which
reside in the default directory is displayed. This will happen if the flags
chosen in CHANGE MODE are set for either SHUTDOWN, STANDBY, or SAVE. Otherwise
a list of *.SAR files in the default directory will be listed. Then the user
is prompted to enter a file name. (For more on the PAGE application, see
chapter
or Software Release 22, ``Parameter PAGE User's
Guide.''
A PAGE file which resides in a different directory can also be
accessed by completely specifying the location of the file. If the file name
which is entered cannot be located the user will be notified and asked to try
again. After two tries control will return to the pulldown menu where he will
be able to exit the pulldown and return to the main menu bar. Note that a PAGE
file contains a number of pages. After inputting a correct file name, a list
of the page names which are in that file will be displayed on the screen. The
user will then be prompted to enter the page name that he desires to save.
In version 1 of the program only one page at a time will be saved. For
example, a single
page may be specified as PCPS-1. In a later version, if the user inputs a page
name PCPS, he will be saving all pages PCPS-1, PCPS-2,

After the page to be saved has been selected the application will create a *.SAR file, which will be an ASCII file containing the NAME, READING, SETTING and STATUS of each device which is on the page. The READING and SETTING will be scaled to engineering units and the STATUS will be saved as hex raw data. The name of the *.SAR file will be constructed from the PAGE name and zero to six characters input by the user. It is expected that a good use of the six characters would be to specify the energy of the beam tune associated with the values being saved, i.e., the *.SAR file for PCPS-1 could be PCPS-1_300GEV.SAR. For a different beam tune the *.SAR file would be PCPS-1_500GEV.SAR.
After the *.SAR file is created, the user will be prompted to enter some comments which describe the values in the saved file. In addition to being appended to the top of the *.SAR file the comments will be written out to a file, on the current directory, called ``SAR_FILE_COMMENTS.TXT''.
The DIRECTORY option allows the user to change the default directory for either the page/device file or *.SAR files. This will affect where the files are read from and written to.
Any device with a SETTING, STATUS or READING property can be saved or restored in this program. The following module types can be started up, shutdown or put into standby:
Run this program to communicate with the 032 CAMAC module that conveys commands to a SWIC scanner. In the upper right-hand corner is displayed the name of the SWIC currently being modified or rebooted, along with the CATV channel the SWIC scanner is on.
This program forces the user to provide the name of a valid SWIC scanner
before any options are executed (except ``Print'' and ``Exit'').
Remember that SWIC scanners have names which append an ``S'' to the name of the
SWIC itself. For example, the SWIC called PE3WC2, which is the second SWIC in
the third Proton East enclosure, is connected to a scanner named
PE3WC2S
. Be
sure you include this final ``S'' when you type in the name of a scanner.
Figure
shows the appearance of
a typical screen from this program.

The following sections correspond to choices available on the main menu bar.
In this case only one SWIC at a time should be in the beam, or at any rate only one of the multiple SWICs should have high voltage switched on to its wire planes. The ``Reb-Set In'' options will:
This chapter has also been published as Software Release Note 43, ``RONALD: A Script Reader,'' by W. S. Higgins.
The purpose of the program RONALD is to create and execute ``script'' files which hold commands for setting EPICURE devices to various values. It is a menu-driven application with a user interface based on the ESM routines. Script files have the extension ``.ESF'' (for ``Epicure Script File'').
The command syntax is:
where ``verb'' is one of the words SET, MULTISET, or CONTROL, and ``devicename'' is a device in the EPICURE Device Database.verb devicename value
In the case of the SET command, ``numeric_value'' is a number.SET devicename numeric_value
MULTISET issues four SET-like commands, with an 8-second delay between them. Command processing waits until the last command is complete; since there are four commands and three delays between them, this command will take about 24 seconds to execute. It is useful for such devices as valves or small children, which need to be told several times what to do. Users should cultivate the virtue of patience.MULTISET devicename numeric_value
The MULTISET command may be abbreviated to MUL.
CONTROL devicename Boolean_value
``Boolean_value'' is the name of a Boolean control value, from the set:
ON OFF POS NEG RAMP DC RESET OPEN CLOSE
Abbreviating CONTROL to CON is acceptable.
The rest of the line is ignored.! This is a comment line.
It is recommended that users create RONALD script files with a standard header. The header consists of several lines, each of which begins with an exclamation point (the comment character). Blanks are left for the name, author, date, and purpose of the script file; the file's author is encouraged to fill them in.
! Script name:
! Date:                     Author:
! Purpose:
When RONALD begins, it displays a menu bar at the top of the screen and places the cursor in a corner of the ``work area'' beneath the menu bar.

To choose an option, the user hits the ``DO'' key on his terminal-which moves the cursor upstairs into the menu bar-and moves among the options with the left and right arrows. Hitting ``Return'' causes RONALD to take the action represented by the selected option.
Text typed in the work area will be echoed on the screen, but will be ignored by RONALD except when it is a response to a prompt.

Files may be created or modified using the familiar EDT editor. Existing File prompts the user to type the name of a file. Only the filename, with no extension (as in FILENAME.EXTENSION), should be typed here. RONALD will append the extension ``.ESF'' to the requested filename. After this happens, the EDT editor is invoked and the file is opened. New File prompts the user for the name of a new file, then calls EDT with that filename. Upon EXITing or QUITting the EDT session, the screen is updated.
EDT tips: To include the contents of another file (for example, one named FILENAME.ESF) in the file you're editing,
Keypad [PF1], then keypad [7] (which yields the prompt ``Command:'')INCLUDE filename.ESF (then hit)
keypad [ENTER] (Hit [ENTER], not [RETURN]!)
The SECTION key (keypad [8]), used in conjunction with the ADVANCE and BACKUP keys (keypad [4] and [5]), is convenient for scrolling through large files.
If you are confronted with the asterisk (*) prompt, then EDT is in its line-editing mode. Type ``c [RETURN]'' to enter screen-editing mode. Control-Z will send you back to line-editing mode again.
File Directory writes in the work area a list of files on the default directory which have the `` .ESF'' extension. If there are more files than will fit on the screen, the screen will fill with 40 filenames in two columns, then filename 41 will ``wrap around'' by overwriting filename 1, and listing will continue from there. Change Directory allows the user to specify a different default directory.
Execute Script prompts the user for the name of a script file, then executes the commands in that file.
Command line text is printed to the screen as commands are executed. After 18 lines have been printed, the lines begin at the top of the screen again.
Your node should also be running DARSERVER to make RONALD work. To check on this, do a SHOW SYSTEM at the DCL level. One of the ``Process Names'' you see should be DARSERVER; if not, RONALD won't execute commands on your machine. (But it will still allow you to edit script files.)
When the execution runs into trouble, error messages may appear on the screen. It is helpful to know what errors we're getting in order to track down problems; users are encouraged to jot error messages down and report them to WARNER::HIGGINS.
ESM_DEMO is a simple example program which illustrates many features of the EPICURE Screen Management interface common to many applications. We will meet this program again in Volume III, Application Programmer's Guide. Take a walking tour of this demonstration and become familiar with its features.
Run the program by choosing ESM_DEMO from your regular menu, or from DCL by typing:
@USR$DISK1:[OPS.COM]SHELL_EXP
(You will probably have to press the NEXT SCREEN key one or more times after
the MENU shell appears, in order to find ESM_DEMO. It is not likely to be on
the first screen.) Then choose ESM_DEMO.
The screen display will resemble figure
.
A title bar appears at the top of the screen with the words ``Example Skeleton Program.'' Immediately beneath it is the ``menu bar,'' which presents the major options avaliable: Scaling, Print, and Exit. These two bars will remain on the screen throughout the operation of the ESM_DEMO program.
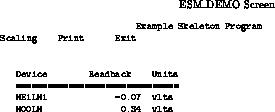
The remaining area, referred
to as the ``work area,'' occupies 22 lines of screen space. The cursor can
be moved around this region using the arrow keys
( and
and
 ). In this region there
is a header which reads ``Device/Readback/Units,'' a row of = signs below
that, and two rows of underscores(_). These rows indicate the two fields
on the screen where the user may type input.
). In this region there
is a header which reads ``Device/Readback/Units,'' a row of = signs below
that, and two rows of underscores(_). These rows indicate the two fields
on the screen where the user may type input.
At startup the cursor is positioned in the first column of the first field. Type the name of an EPICURE device, such as the beam loss monitor ME1LM1. Then hit the RETURN key.
The device name is suddenly rendered into boldface capital letters. You should see numbers appear in the Readback field, and units displayed in the Units field. (If there is a problem, an error message may be displayed in the ``error zone'' at the bottom of the screen, or in the Readback field.) The numbers should update every few seconds as new data requests are returned from the front ends computers.
Move the cursor, using the arrow keys, to the first position in the second row of underscores. Type the name of another device, such as M00LM. Its readback and units should also appear on the display.
Move the cursor over to the Units field of this row. Try typing some characters. Notice that the program refuses to echo your characters to the screen, even when you hit RETURN, while the cursor is not in the Device field. The Device field is the only one of the three fields where the program responds to your keyboard input.
Move back to the Device field and play around. Use different device names, or type characters in various positions. Note that:
You might try typing the name of a nonexistent device into the Device field. This should produce errors as EPICURE fails to recognize the device. If these errors are associated with a particular device, they generate a one-word message which appears in the Readback field on that devices line. If they are more general errors, they give rise to informative messages which appear near the bottom of the screen. Since there is a limited amount of space, new error messages can overwrite old ones in the ``error zone.''
Now try choosing some options from the menu bar. Press the DO key at the top of your keyboard. The cursor moves to the first choice in the menu bar, ``Scaling.'' The word is also highlighted in reverse video. To choose Scaling, press the RETURN key. This causes a small vertically stacked menu, called a ``pulldown menu,'' to appear just below the word ``Scaling.'' To the eye of the user, this positioning associates the three choices with Scaling in a clear way.
Use the up and down arrows to move within the pulldown menu among the options Raw, Intermediate, and Engineering. These represent the three available flavors of scaling: raw unscaled bits just as they come back from the device, intermediate units (usually used for troubleshooting hardware), and engineering units (the default; you've already got engineering units showing on your screen). As you move to a new option it is displayed in reverse video, so it contrasts with the color of the other two.
To choose one of these, say Raw, put the cursor over Raw and press RETURN again. This is the standard means of choosing from a menu. You should see the Units string change from ``volts'' to ``hex,'' and the next update of the Readback values will display hexadecimal digits representing the raw data.
What if you don't want to take any of the choices offered in a menu? Press DO again. Place the cursor on the ``Scaling'' option and press RETURN. The Raw/Intermediate/Engineering menu will again appear. You can leave this menu without making a choice by pressing Control-Z. The cursor is returned to the work area (the state the program was in before you pressed DO). In general this works for menus at any level of an application. If you are in the work area, not in a menu, and you press Control-Z, the application program will terminate execution. So it is a quick way to exit the program without choosing the ``Exit'' option from the menu bar. (The F10 function key performs the same function as Control-Z.)
You might wish to view the reading from another device. Position the cursor on the first column in one Device field and type the name of a different device, such as the Meson loss monitor ME2LBP1. The new device will replace the name of the old device in boldface, and its new readback and units will appear in the appropriate fields.
Press the DO key again. Use the left or right arrows to move over to ``Print.'' Press RETURN to choose the Print option. A ``dialog box'' will appear, saying ``PLEASE WAIT, COLLECTING PRINT QUEUE NAMES.'' After a few seconds a pulldown menu listing the printer queues as its options will appear. Use the arrows to move to your favorite printer, then press RETURN to pick it. An image of the screen will be routed to the printer. If you don't want to make a hard copy after all, choose the ``Exit'' option and the menu will disappear. The cursor will be returned to the spot where it was before you pressed DO. (The ``Print'' option is friendly. The next time you choose ``Print,'' it will remember which printer is your favorite, and start off with that one as the default menu choice.)
Speaking of exiting, you can leave the ESM_DEMO application by pressing DO, moving to the ``Exit'' choice on the menu bar, and hitting RETURN.
If the cursor is in the work area and not in a menu, hitting Control-Z will also exit the program. In this case, a dialog box will appear, asking `` Do you really want to exit? Y''
If you hit RETURN here, the program will exit, because it assumes you are happy
with the default choice (``Y'') it offers you. If you don't want to exit, hit
the left-arrow key (
 ) to move the cursor one space to the left,
positioning it over the capital Y. Then type ``N.'' This will cause the
dialog box to disappear, and the program will resume as if you'd never asked to
exit. (It's looking for a single-character string in that spot where the ``Y''
is sitting. Any character other than a ``Y'' will cancel the request to exit.
Hitting a key while the cursor is not over the ``Y'' spot causes ESM_DEMO to
pick up the ``Y'' and assume you really wanted to exit.)
) to move the cursor one space to the left,
positioning it over the capital Y. Then type ``N.'' This will cause the
dialog box to disappear, and the program will resume as if you'd never asked to
exit. (It's looking for a single-character string in that spot where the ``Y''
is sitting. Any character other than a ``Y'' will cancel the request to exit.
Hitting a key while the cursor is not over the ``Y'' spot causes ESM_DEMO to
pick up the ``Y'' and assume you really wanted to exit.)

RDCS microVAX Network
Computer Account Request
circle one:
DISNEY other
(control system operations)
Name
ID No Mail Stop Phone
On-site location
Division/Section
Name of Group Leader
Describe reason for account
_
_
Password (8-31 characters)
Signature
Date
Office use only:
UIC and group name:
This form was included in Software Release 34.1.